Data Scientist Dashboard & Workflow
Data Scientist Menu
The Data Scientist Screen provides a GUI-based mechanism to navigate through the workflow.

Menu Item |
Function |
|---|---|
Dashboard |
Overview of the current status of the workflow |
Repos |
Create, view, and manage the Project, Dataset, and Model repos |
IDEs |
Create, view, and manage JupyterLab and RStudio |
Runs |
Create, view, and manage training and preprocessing runs |
Model Catalog |
Optimized models, ready for deployment |
Test Inferences |
Models that have been deployed locally for test inference |
Pipelines |
Create, view, and manage Kubeflow pipelines & experiments |
Storage |
View and storage utilization for the user |
Utilization |
View the CPU, GPU, memory, and pod utilization for the user |
Data Scientist Dashboard
The Data Scientist dashboard provides an overview of the current state of the workflow.
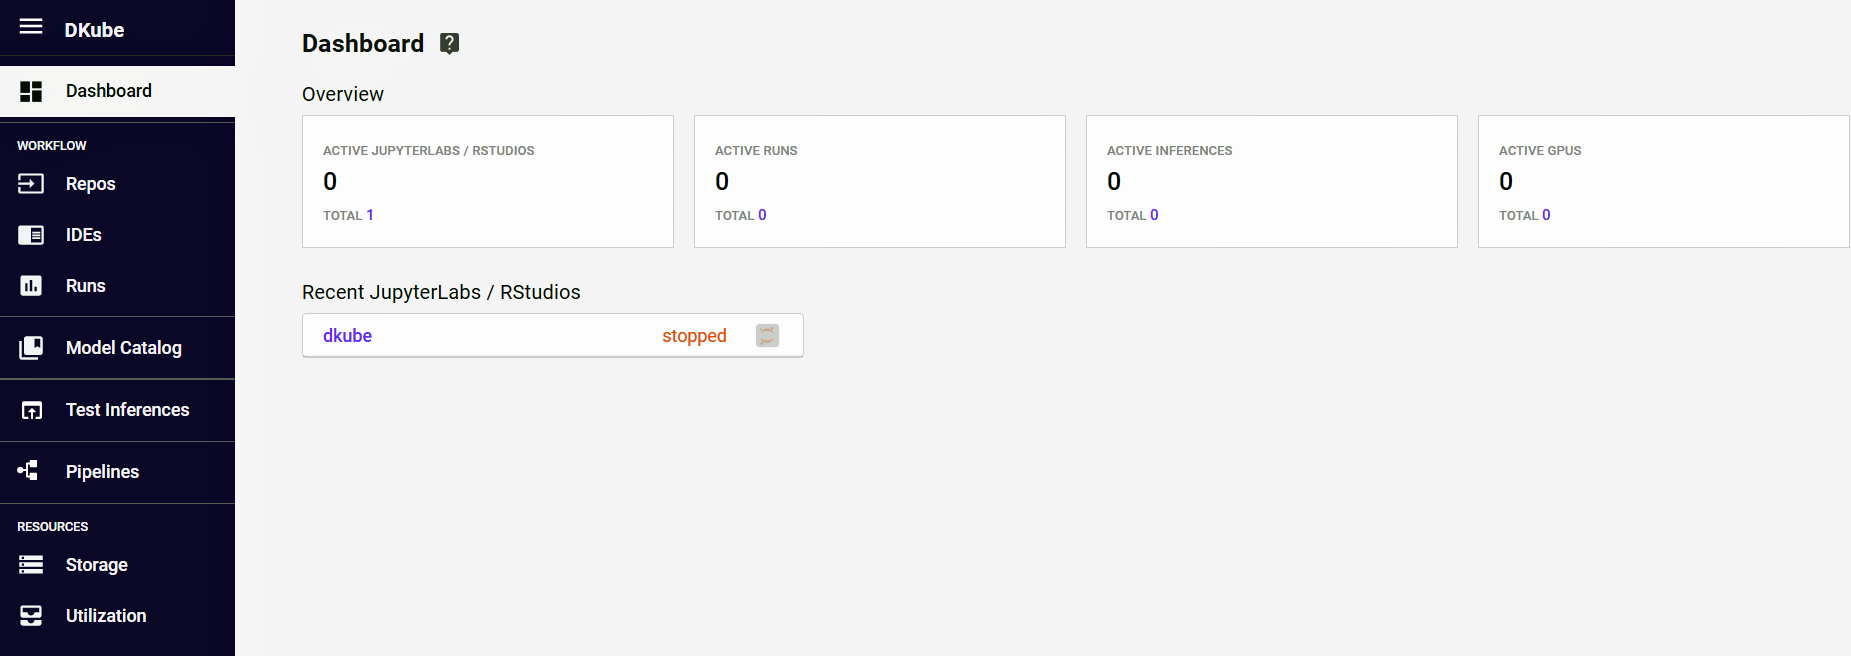
From the dashboard, the user can go directly to recent experiments and runs.
Data Scientist Workflow

Function |
Description |
|---|---|
Project |
Folder containing the program code for experimentation and training |
Dataset |
Folder containing the datasets for training |
Model |
Trained model that can be used for inference or transfer learning |
DKube Run |
Execution of DKube training or preprocessing code on dataset |
IDE |
JupyterLab or RStudio |
Pipeline |
Automated execution of a set of steps using Kubeflow pipelines |
Pipeline Run |
Single execution run of a Kubeflow Pipeline |
Experiment |
Group of Pipeline runs, used to enable better run management |
The standard workflow for a data scientist using DKube is as follows:
Load the Projects and Datasets into DKube (Section Projects)
Create a JupyterLab Notebook or RStudio instance (Section Create IDE)
Create a Run (Section Create Training Run)
Deploy to a test Inference or release for production serving
In order to automate the workflow, create a Kubeflow pipeline description and load it into DKube, then execute a Pipeline Run (Section Kubeflow Pipelines)
Shared Data
Users in a Group share Projects, Datasets, Notebooks, Runs, & Models. These are shown on the screens for each type of data. At the top left-hand of the screen there is a dropdown menu that allows the User to select what is visible: just the User’s data, just the shared data, or both.

Hyperparameter Optimization
DKube implements Katib-based hyperparameter optimization. This enables automated tuning of hyperparameters for a project and dataset, based upon target objectives.
This is described in more detail at Katib Introduction.
The section Hyperparameter Optimization provides the details on how to use this feature from within DKube.
Example Project and Dataset Locations
Some example projects and datasets are available from One Convergence.
Mnist Digits Classification
This example classifies digits from images. It can be used to demonstrate:
Training
Inference
Hyperparameter Tuning
Kubeflow Pipelines
Note
The test images for this model are in a specific format, so the supplied images should be used to test the inference
Field |
Value |
|---|---|
Project |
|
Dataset |
|
Dataset Mount Path |
/opt/dkube/input |
Model Mount Path |
/opt/dkube/output |
Test Images |
|
Hyperparameter Tuning File |
https://oneconvergence.com/guide2/downloads/mnist-tuning-2.yaml (see section Configuration Submission Screen - Hyperparameter Tuning) |
Pipeline File |
Included in DKube Notebook (see section Kubeflow Pipelines) |
Cat & Dog Classification
This example classifies an image as either a dog or a cat. It can be used to demonstrate:
Training
Inference
Hyperparameter Tuning
Kubeflow Pipelines
Field |
Value |
|---|---|
Project |
|
Dataset |
|
Dataset Mount Path |
/opt/dkube/input |
Model Mount Path |
/opt/dkube/output |
Test Images |
Any image in jpg, png, or tiff format |
Hyperparameter Tuning File |
https://oneconvergence.com/guide2/downloads/catdog-tuning-2.yaml (see section Configuration Submission Screen - Hyperparameter Tuning) |
Pipeline File |
Included in DKube Notebook (see section Kubeflow Pipelines) |
Repos
There are 3 types of repositories under the Repo menu item : Projects, Datasets, and Models. In order to use them, they must first be accessible by DKube. There are different ways that the repositories can be accessed by DKube. These are described in more detail in the sections that describe each input source.
They can be downloaded to the internal DKube storage area. In this case, the data becomes part of DKube and cannot be updated externally.
They can be accessed as a pointer to a folder or file. In this case, the files can be updated by an external application and DKube will access the new version of the file on the next run.
Projects

Projects are folders that contain the program code available within DKube to train models using datasets.
The Projects screen provides the details on the programs that have been downloaded or linked by the current User, and programs that have been downloaded by other Users in the same Group.
The details on the program can be accessed by selecting the name. The details screen shows the source of the project, as well as a table of versions for this project.

Add a Project

In order to add a program folder to a Project, and use it within DKube:
Select the “+ Project” button at the top right-hand part of the screen
Fill in the information necessary to access the Project
Select the “Add Project” button
Fields for Adding a Project
The input fields for adding the Project depend upon the source. The Project is downloaded into the internal DKube storage.
Field |
Value |
|---|---|
Name |
Unique user-chosen identification |
Tags |
Optional, user-chosen detailed field to allow grouping or later identification |
Git
The Git selection copies the files from a GitHub or Bitbucket repo folder into the local DKube store.
Field |
Value |
|---|---|
URL |
url of the directory that contains the program code. An example GitHub url is https://github.com/oneconvergence/dkube-examples/tree/2.0/tensorflow/classification/mnist/digits/classifier/program |
Private |
Select this option if you need additional credentials to access the repo |
Bitbucket Access
When accessing a Bitbucket repository, the following url forms are supported.
url |
Authentication |
|---|---|
Authentication with username and password |
|
Authentication with ssh key |
|
Authentication with ssh key |
The following links provide a reference on how to access a Bitbucket repository:
Private Authentication
When selecting a Private repo, more options are provided to enter the credentials. There are 3 different methods to enter credentials:
ssh key
Username and password
Authentication token

When using an ssh key:
The public key should be copied to the repository server
The private key should be copied to the local workstation, and uploaded from there
Note
DKube supports the pem file format and the OpenSSH & RSA private key formats
The following link provides a reference on how to create a GitHub token: Create GitHub Token
Delete a Project
Select the Project to be deleted with the left-hand checkbox
Click the “Delete” icon at top right-hand side of screen
Confirm the deletion
Datasets

The Datasets contain the training data. Datasets can be added to DKube in the following ways:
Manually added for use as an input for a run with or without versioning capability, as explained in Versioning
Manually added as a placeholder for use as a versioned output
Created as an output from a preprocessing run

DVS provides a way for DKube to track versions within the application. To use this option, the DVS name will need to be created, as described in DVS. This will set up the metadata and data storage locations.
Dataset Details
The details for the Dataset contain information about where it came from, where it is stored, and the versions.

Dataset Version Detail
Selecting the version of a Dataset brings up a screen that provides more details on that version, including a list of the Runs that use that version.

Dataset Version Lineage
If the Dataset was created as part of a Preprocessing Run, selecting the “Lineage” tab of the Dataset will provide the full lineage. This provides all of the inputs that were used to create the Dataset.

Add a Dataset
The input fields for adding the Dataset depend upon the source. The Dataset is either downloaded into the internal DKube storage, or referenced from its location, depending upon the type of input source.
Datasets Used for Training Input
A Dataset that is intended as the input to a training run can be added with or without versioning capability. For this type of usage, the fields should be filled in as follows:
Field |
Value |
|---|---|
Versioning |
DVS or None, based on whether versioning is required |
Dataset Source |
From dropdown menu |
Note
The dataset source field will show different options depending upon whether versioning is selected. Some input sources are only compatible with versioning, and others are are only compatible without it

Datasets Used for Preprocessing Output
A new Dataset that is intended as an output for a preprocessing run must first be added in the Dataset repo as a blank (version 1) entry. A new version of the same Dataset will be created by the preprocessing run. For this usage, the fields should be filled in as follows:
Field |
Value |
|---|---|
Versioning |
DVS |
Dataset Source |
None |

Adding the Dataset

In order to access a Dataset, and use it within DKube:
Select the “+ Dataset” button at the top right-hand part of the screen
Fill in the information necessary to access the Dataset
Select the “Add Dataset” button
Fields for Adding a Dataset
For all inputs there are common fields.
Field |
Value |
|---|---|
Name |
Unique user-chosen identification |
Tag |
Optional, user-chosen detailed field to allow grouping or later identification |
Git
The Git option copies the files from a GitHub or BitBucket repo folder into the local DKube store.
Field |
Value |
|---|---|
URL |
url of the directory that contains the Dataset. An example GitHub url is https://github.com/oneconvergence/dkube-examples/tree/2.0/tensorflow/classification/mnist/digits/classifier/program |
Branch |
Branch within the Git repo |
Private |
Select this option if you need additional credentials to access the repo |
Note
If the branch of the rep is contained within the url, the Branch input field can be left blank. If the Git repo does not have the branch in the url, the Branch input must be filled in to identify it.
Bitbucket Access
When accessing a Bitbucket repository, the following url forms are supported.
url |
Authentication |
|---|---|
Authentication with username and password |
|
Authentication with ssh key |
|
Authentication with ssh key |
The following links provide a reference on how to access a Bitbucket repository:
Private Authentication
When selecting a Private repo, more options are provided to enter the credentials. There are 3 different methods to enter credentials:
ssh key
Username and password
Authentication token
When using an ssh key:
The public key should be copied to the repository server
The private key should be copied to the local workstation, and uploaded from there
Note
DKube supports the pem file format and the OpenSSH & RSA private key formats
The following link provides a reference on how to create a GitHub token: Create GitHub Token
S3
The fields are compatible with the standard S3 File System. The files are copied into the local DKube store. The files can be:
On AWS
On an S3-compatible Minio server ( https://min.io/)
Field |
Value |
|---|---|
AWS |
Check this box if the Program is on AWS |
Endpoint |
If not AWS, url of the Minio server endpoint |
Access Key ID |
https://docs.aws.amazon.com/general/latest/gr/aws-sec-cred-types.html |
Secret Access Key |
https://docs.aws.amazon.com/general/latest/gr/aws-sec-cred-types.html |
Bucket |
https://docs.aws.amazon.com/AmazonS3/latest/dev/UsingBucket.html |
Prefix/Subpath |
Folder within the bucket. If the bucket is called “examples”, and it has a sub-folder called “mnist”, with a further sub-folder called “dataset”, the syntax for this field is “mnist/dataset”. |
GCS
The GCS input selection will use Google Cloud Storage. The files are copied to the local DKube storage.
Field |
Value |
|---|---|
Bucket |
Bucket name |
Prefix |
Relative path from the bucket to the specified folder |
Secret Key |
JSON file containing the GCP private key |
K8S
DKube can access a k8s persistent volume created for the user. The files are referenced and are not copied from the volume to the local DKube store.
Field |
Value |
|---|---|
Volume |
Persistent volume directory created for user |
NFS
The NFS input option allows a cluster wide nfs server to be the source of the data. The data is referenced from the nfs and not copied to the DKube store.
Field |
Value |
|---|---|
Server |
IP address of the nfs server identified during installation |
Path |
Absolute path to the dataset on the nfs server. This is identified during installation. |
Other
This input source provides the ability to access a Dataset from other sources. The code will be copied to DKube. The sources are:
Any public url
A file from the user’s local workstation
Field |
Value |
|---|---|
URL |
Public URL for access to the directory |
Select File |
Select the file to be uploaded |
Extract uploaded file |
Check this box to extract the files from a compressed archive |
Note
The Workstation input source will upload a single file. In order to upload multiple files in one step, an archive file (TAR or ZIP) can be created that combines the multiple files into one. If the uploaded archive file is a combination of multiple files, the checkbox Extract upload file should be selected. DKube will then uncompress the single archive file into multiple files. If the “Extract upload file” is not checked, the archive will be treated a single file, with the assumption that the model code will use it as it is.
Delete a Dataset
Select the Dataset to be deleted with the left-hand checkbox
Click the “Delete” icon at top right-hand side of screen
Confirm the deletion
Models

The Models Repo contains all of the models that are available within DKube. Models are added to the DKube repo in the following ways:
Manually added for use as an input for a run that includes transfer learning with or without versioning capability, as explained in Versioning
Manually added as a placeholder for use as a versioned output
Created as an output from a training run

Model Details

Selecting the Model will call up a screen which provides more details. This includes the information used to create the model and a list of versions. See section Versioning to understand how Model versions are created.
Model Version Details
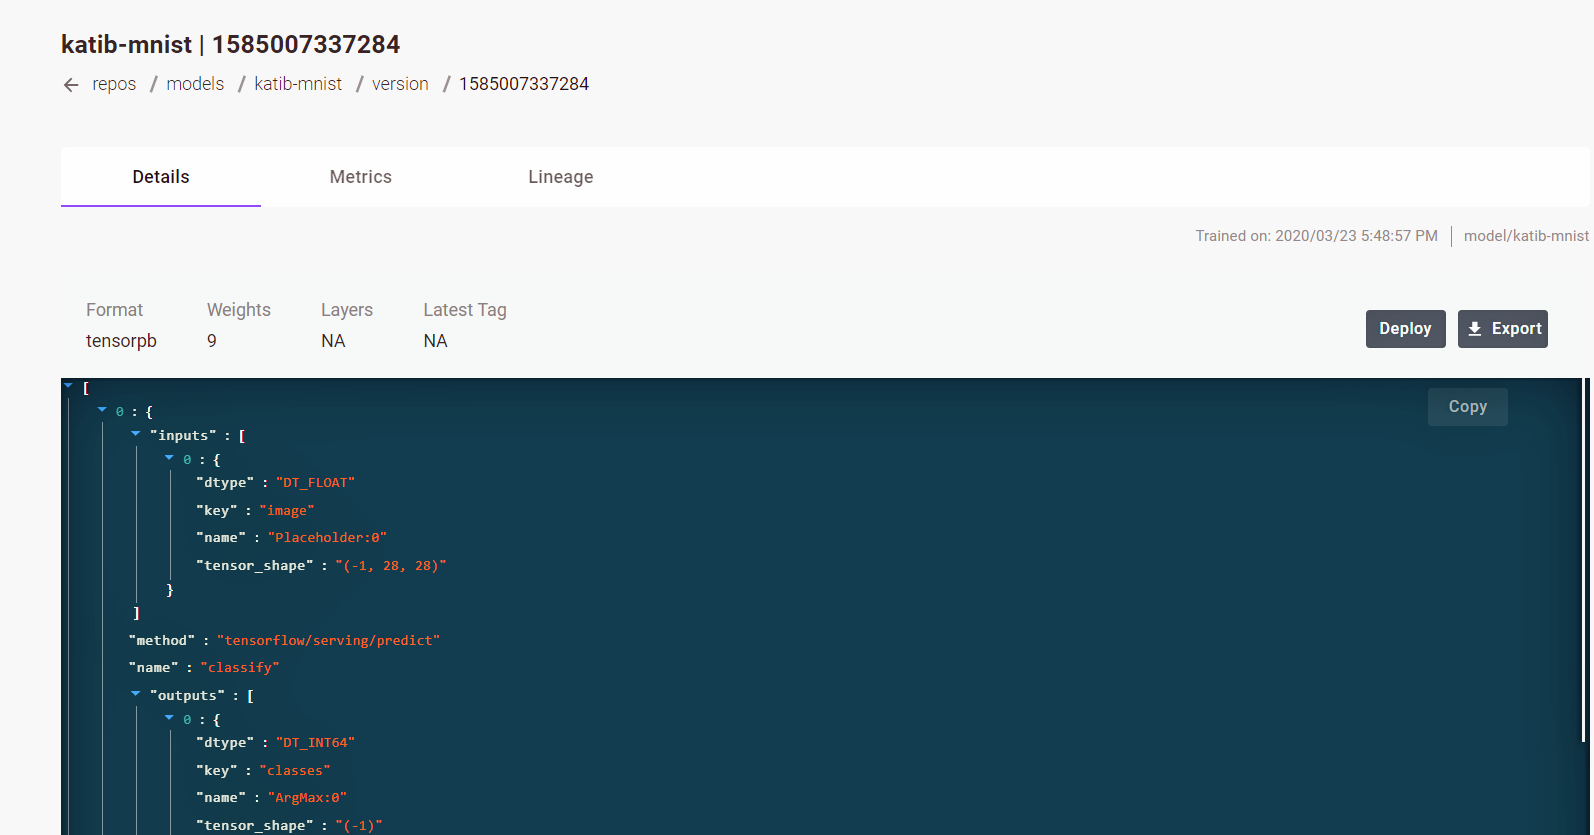
More detail on a specific model version can be obtained by selecting that version on the detail page. This will bring up a screen that shows the format of the model and its weights and layers.
Model Version Lineage

The complete Model lineage can be viewed by selecting the “Lineage” tab on the Model Version Details screen. This provides the complete set of inputs that were used to create the Model.
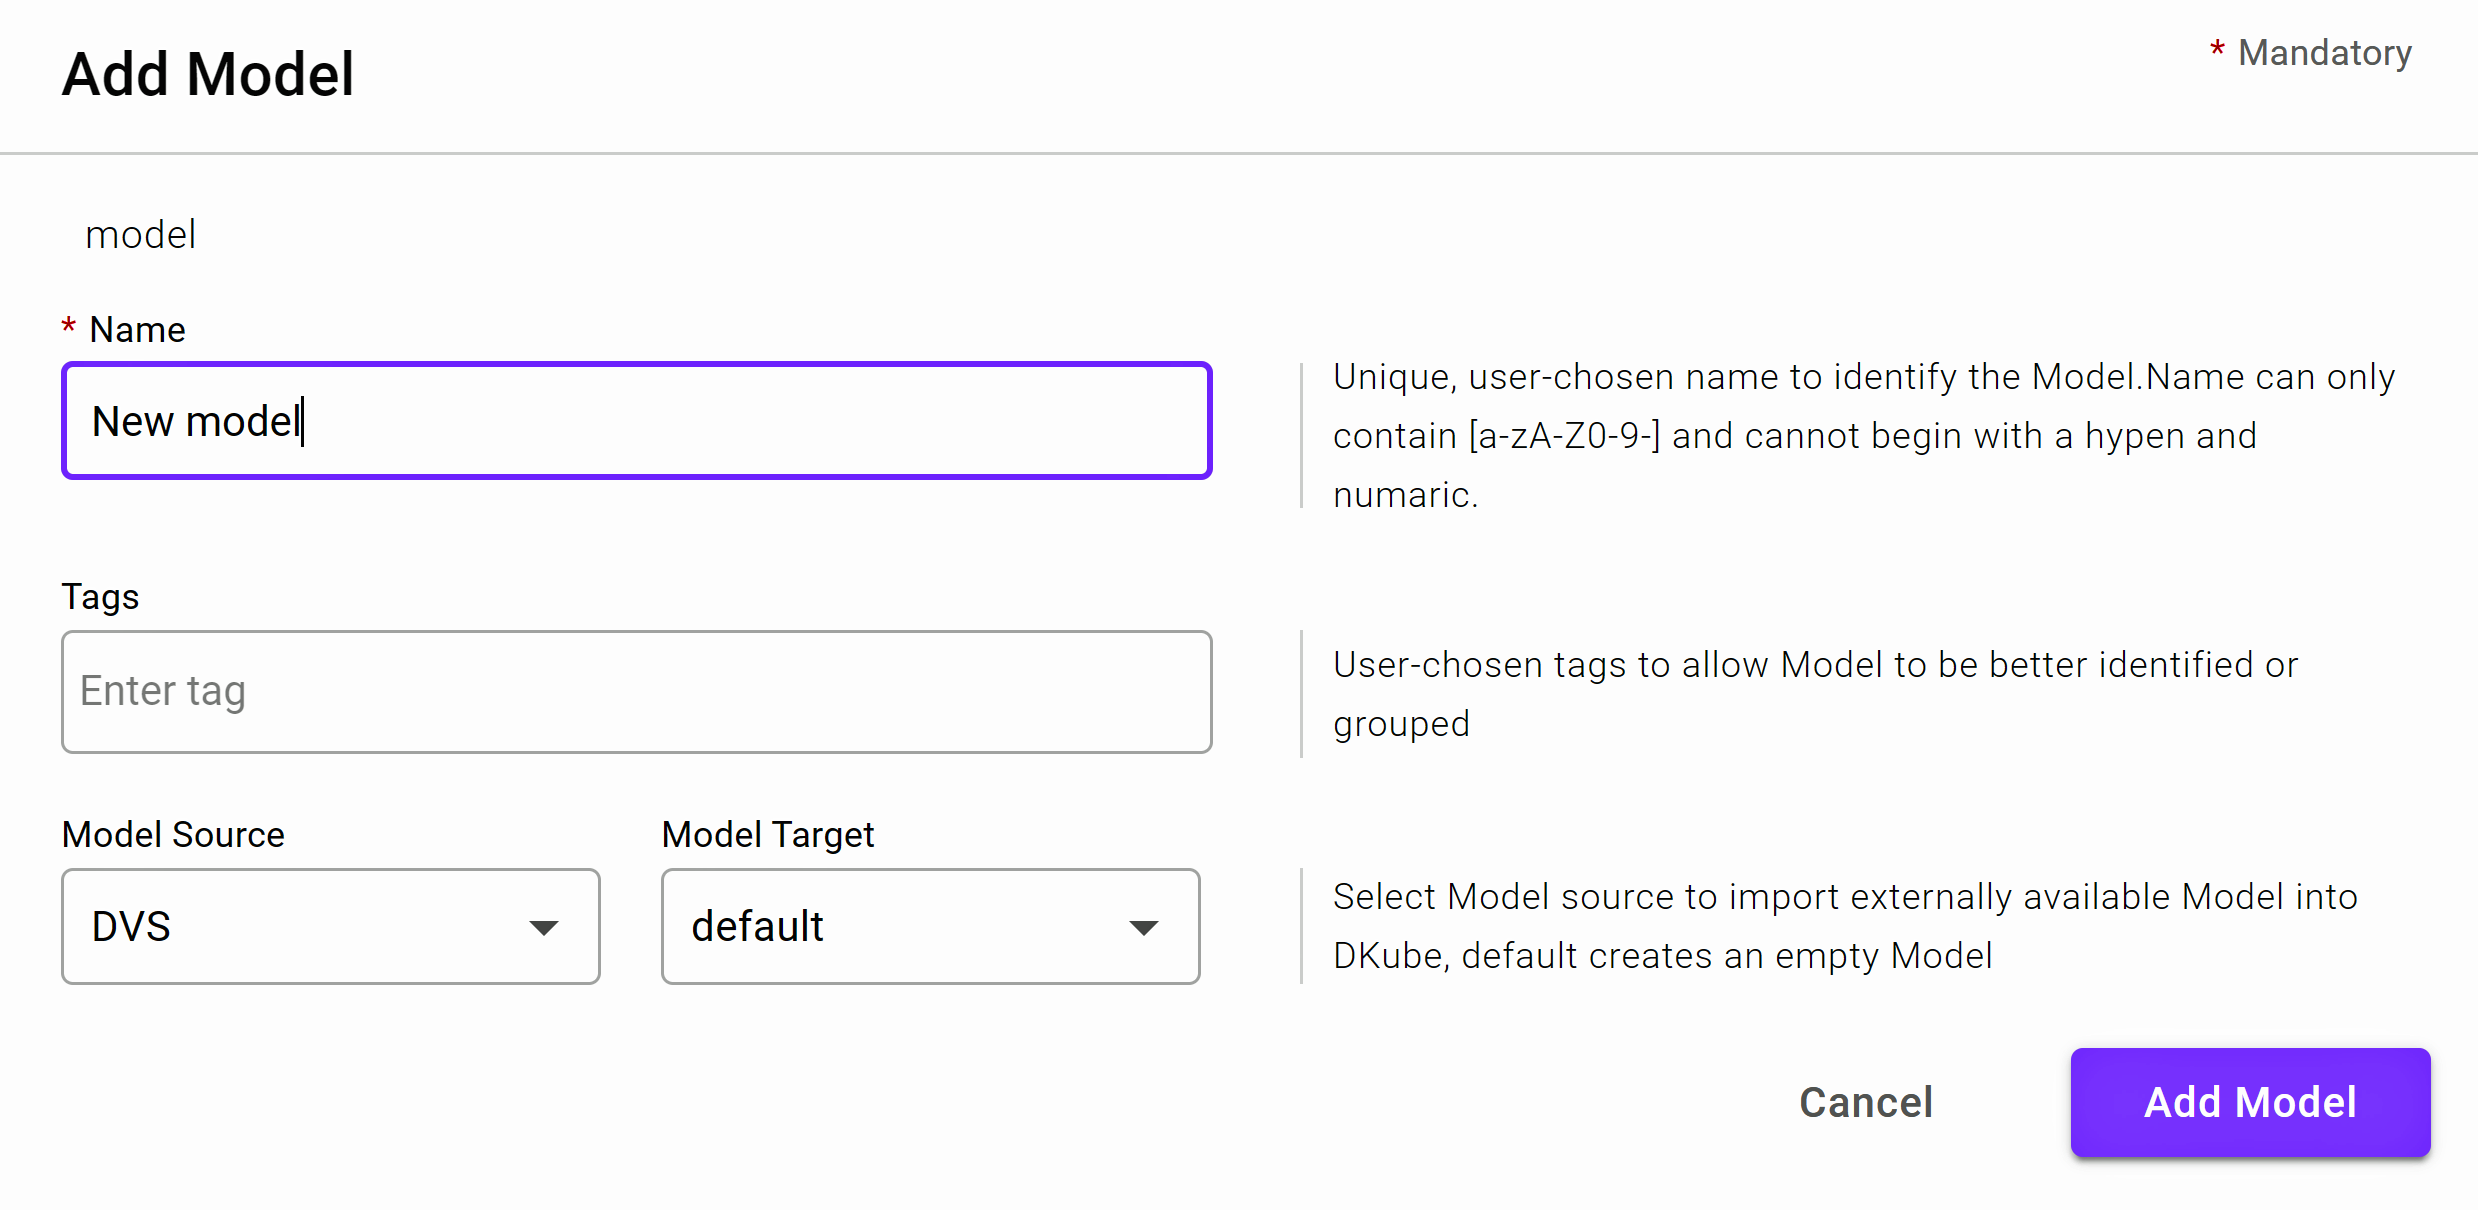
Add a Model
Models are added manually for 2 different purposes:
The Model is going to be used as an input to a Run for transfer learning, where a partially trained model is further trained
The Model will become an output from a Training Run
The screens and fields for adding a Model are the same as for adding a Dataset, described at Add a Dataset .
Model Workflow

The overall workflow of a Model is described in section MLOps Concepts. A diagram of the flow is shown here. This describes the expected stages that a Model goes through from creation to production. This section provides the details of this workflow within DKube.
Compare Models
Model versions can be compared from the detail screen to understand how they perform based on their metrics. To perform a comparison, the models to be compared should be selected, and the “Compare” button should be used. This will bring up a window with the comparison. The compare function is used by the Data Scientist and ML Engineer during their development.


Model Actions
Models can have a variety of different actions performed on them from the details screen.

Edit Model
The description and tags can be modified using the “Edit” button.
Test Model
A model can be deployed on a the local training cluster, which will expose an API that can be used for testing the model using inference input. One Convergence provides a test inference application for our example models. For other models, the user would need to do a custom inference and call the serving API.
The test inference is launched from the actions section on the Model details screen, and is available for model versions.
Selecting “Test Inference” will bring up a pop-up window, where the inference information is completed before starting the inference. Once the test inference has been started, it will appear in the “Test Inferences” menu screen.

The inference may need preprocessing, depending upon the program code and the expected flow when deployed. If the inference does need preprocessing, “Preprocessing” should be selected, and the url that points to the preprocessing Docker image should be provided.
The examples that are provided by One Convergence do need preprocessing.
Example |
Image |
|---|---|
mnist |
ocdr/mnist-example-preprocess:2.0.4 |
catsdogs |
ocdr/catdogs-example-preprocess:2.0.4 |
The Model will appear in the “Test Inferences” menu screen. The serving API is provided on that screen.

Release Model

As described in the MLOps workflow, the Data Scientist does the basic work to create and test the code, then Releases one of the Models to the ML Engineer. This is accomplished by using the “Release” button in the “Actions” area of the Model Versions table. This will change the stage of the Model to “Released”. This enables the ML Engineer to know that the Model is ready for optimization and productization.

Releasing a model will cause it to show up in the “Released” view on the Model repo screen. Released models can be viewed by choosing the Released selection from the drop-down menu next to the Model title at the top of the page.

Publish Model
The released model will show up in the ML Eng screens. The next phase is handled by a user with an Operator role, working in the Data Scientist screens. The ML Eng will optimize, automate, and productize the model using the same tools as the Data Scientist, using larger datasets and other configurations and parameters that are necessary.
The Model that the ML Eng believes is the best fit to the goal is “Published”. Publishing a Model copies it to the Model Catalog, which makes it available to the PE Engineer for testing and eventual Deployment to a production server.

Field |
Value |
|---|---|
Name |
Unique user-chosen identification |
Container Image |
Container that will be used for the model deployment |


IDEs
DKube supports JupyterLab and RStudio. It can include the model and dataset information, as well as the hyperparameters for the model run.

The status messages are described in section Status Field of IDEs & Runs.
Special “DKube” Notebook
A special Notebook is created when DKube is installed, named “DKube” (item 1 in the screenshot above). It is used for tasks such as pipeline creation and inference.
The DKube Notebook is in the “stopped” state when DKube is first run. In order to use it, select the DKube Notebook instance and start it.
It is good practice to stop Notebook instances if they are not going to be used in order to conserve system resources.
TensorBoard
TensorBoard can be accessed from the Notebook screen.
When an IDE instance is created, TensorBoard is in the “stopped” state. In order to use it, TensorBoard must be started by selecting the play icon (item 2 in the screenshot above).
Note
It can take several minutes for TensorBoard to be active after being started
Note
It is good practice to stop TensorBoard instances if they are not going to be used in order to conserve system resources
IDE Actions
There are actions that can be performed on an IDE instance (item 3 in the screenshot above).
A JupyterLab or RStudio instance can be started
A Training Run can be submitted based on the current configuration and parameters in the IDE.
In addition, there are actions that can be performed that are selected from the icons above the list of instances (item 4 in the screenshot). For these actions, the instance checkbox is selected, and the action is performed by choosing the appropriate icon.
An instance can be stopped or started
Instances can be deleted
A new instance can be created by either cloning it (clone icon), or starting from a blank configuration (+ RStudio or + JupyterLab icon)
IDE Details
More information can be obtained on the Notebook by selecting the name. This will open a detailed window.

Create IDE
There are 2 methods to create an IDE instance:
Create a new JupyterLab or RStudio instance by selecting the “+ <Instance Type>” button at the top right-hand side of the screen, and fill in the fields manually
This is typically done for the first instance, since there is nothing to clone
Clone an instance from an existing instance
This will open the same new submission dialog screen, but the fields are pre-loaded from the existing instance. This is convenient when a new instance will have only a few different fields, such as hyperparameters, from an existing one.
In both cases, the new instance submission screen will appear. Once the fields have been entered or changed, select “Submit”

There are 3 sections that provide input to the new instance.
The Basic tab allows the selection of:
The name of the instance and any other pertinent information
The docker image to use: either the standard DKube image or your own custom image
The framework and version
The Repo tab selects the Project code, Datasets, and Models to use for transfer learning
The Configuration tab selects:
Inputs related to hyperparameters
GPU requests
Note
It is not required to make changes to all of the tabs. There are some mandatory fields required, which are highlighted on the screen, but once those have been filled in the instance can be created through the Submit button. The tabs can be selected directly, or the user can go back and forth using the navigation buttons at the bottom of the screen.
Note
The first Run or instance load will take extra time to start due to the image being pulled prior to initiating the task. The message might be “Starting” or “Waiting for GPUs”. It will not happen after the first run of a particular framework version.
Mount Path for Datasets and Models
The Dataset & Model repos that are added as part of the submission contain a field called the “Mount Path”. This is the path that is used by the Project code to access the repo.

Basic Submission Screen
Field |
Value |
|---|---|
Name |
Unique user-chosen identification |
Description |
Free-form user-chosen text to allow later identification or information |
Tags |
Optional, user-chosen detailed field to allow grouping or later identification |
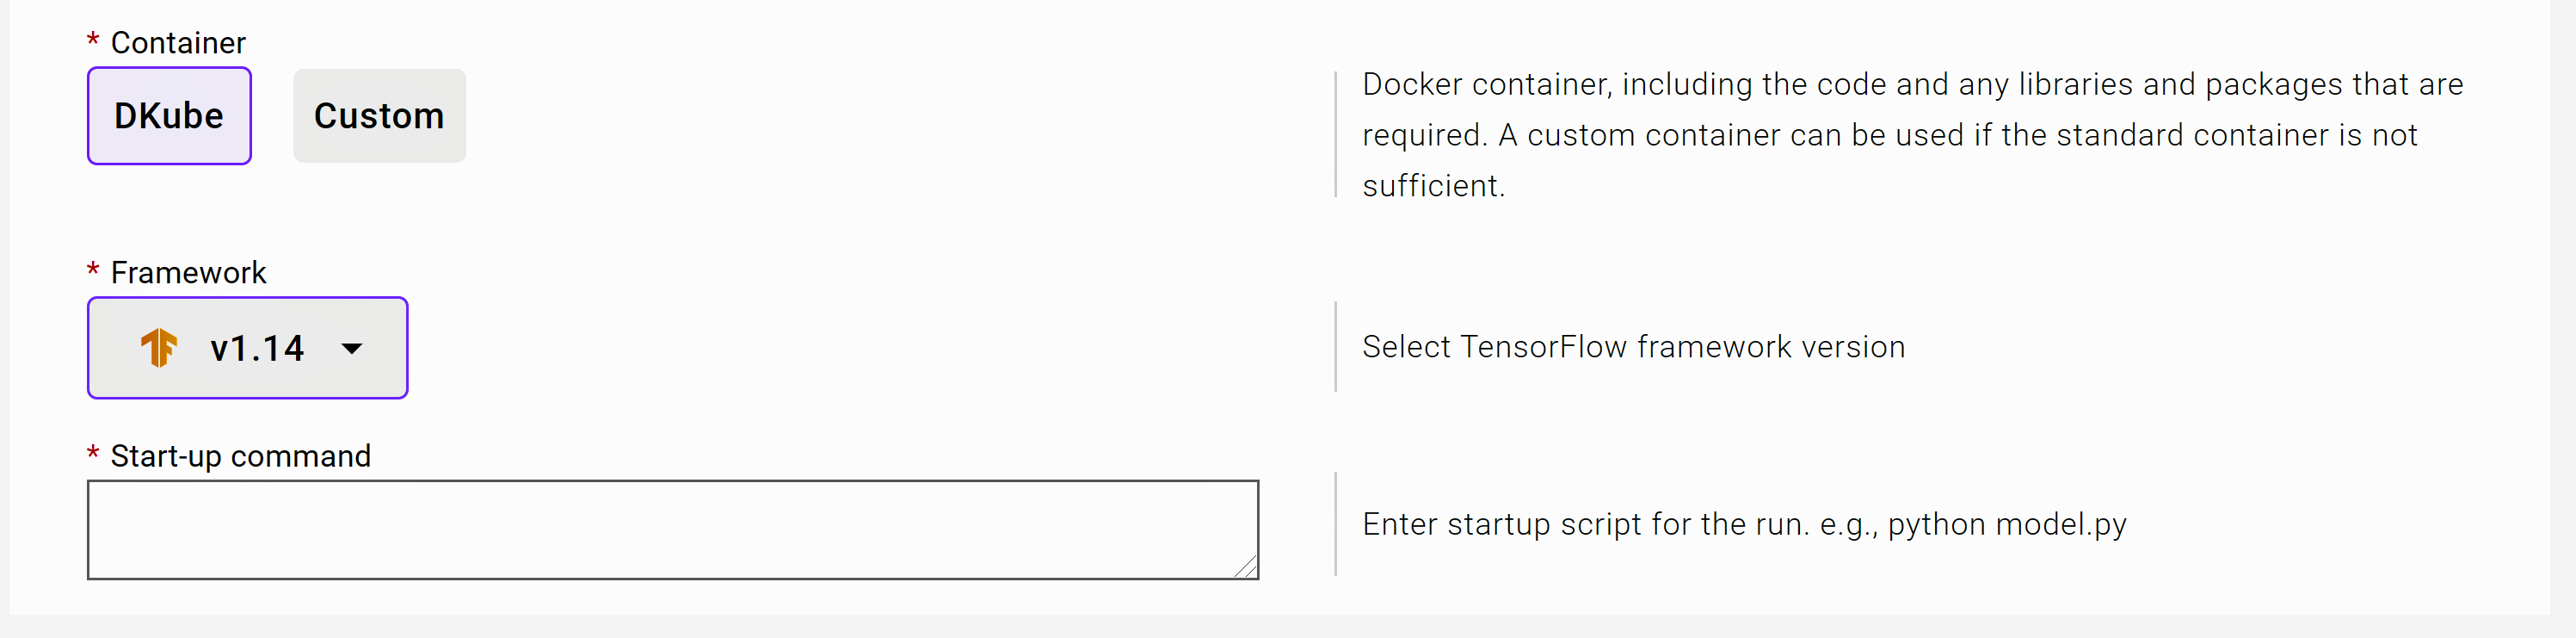
Container |
Docker container to use for the instance: standard DKube or custom |
Framework |
Framework type and version |
Custom containers are supported to extend the capabilities of DKube. In order to use a customer container within DKube, select “Custom” instead of “DKube”. This will provide more options.
Enter the image location in the field labeled Docker Image URL in the format registry/<repo>/<image>:<tag>
If the image is in a private registry, enable the Private option, and fill in the username and password
If the container needs to run as a user other than than root user, fill in the Run with User field

Repo Submission Screen
The Repos submission screen selects the repositories required for training or experimentation:
The Project node repo
The Dataset repo(s)
The Model repo for use in transfer learning

A repo is chosen by selecting the “+” beside the repo type, and choosing the repo(s) from the list provided. The repo is required to be made available to DKube through the process described in Repos
The version of the repo can also be chosen
A mount path should be selected for the repo, which should correspond to the expected path in the Project code
Configuration Screen
The configuration screen allows the selection of the environment, including the hyperparameters, and how to handle the compute resources.

Hyperparameters
The configuration section allows the user to input the hyperparameters for the instance. The use of the hyperparameters is based on the program code. Hyperparameters can be added by selecting the highlighted “+”. This will allow an additional “Key” and “Value”. More parameters can be added by repeated use of this option.
GPUs
The number of GPUs can be selected for the instance. The GPUs in a Group are shared with all Users in a Group. If there are currently not enough GPUs to satisfy the request, the instance will be queued until enough GPUs are available.
The GPU selection area shows how many GPUs are available in the group. Selecting more GPUs than are available in the group will cause an error.
Note
The screen shows how many GPUs available in the Group, but these are shared with other instances and users. The actual number of GPUs available when the instance is submitted may be fewer than what is shown.
Just below the GPU selection is a checkbox that allows the instance to start with the number of GPUs that are available upon submission, including none, if all of the GPUs are currently in use. This will guarantee that the instance does not queue.
Delete IDE
Select the instance name from the left-hand checkbox
Click “Delete” icon at top right-hand side of screen
Confirm the deletion
Runs

A Run is the execution of Project code using one or more datasets, an optional pre-trained model, and a set of hyperparameters and a set of resources. The status messages are described in section Status Field of IDEs & Runs .
The Run screen allows the user to manage training and preprocessing on a Project based on the dataset selected. The primary difference between the functions are:
Once the Training Run is complete, it creates a trained Model
When a Preprocessing Run is complete, it creates a new Dataset ( Preprocessing Runs)

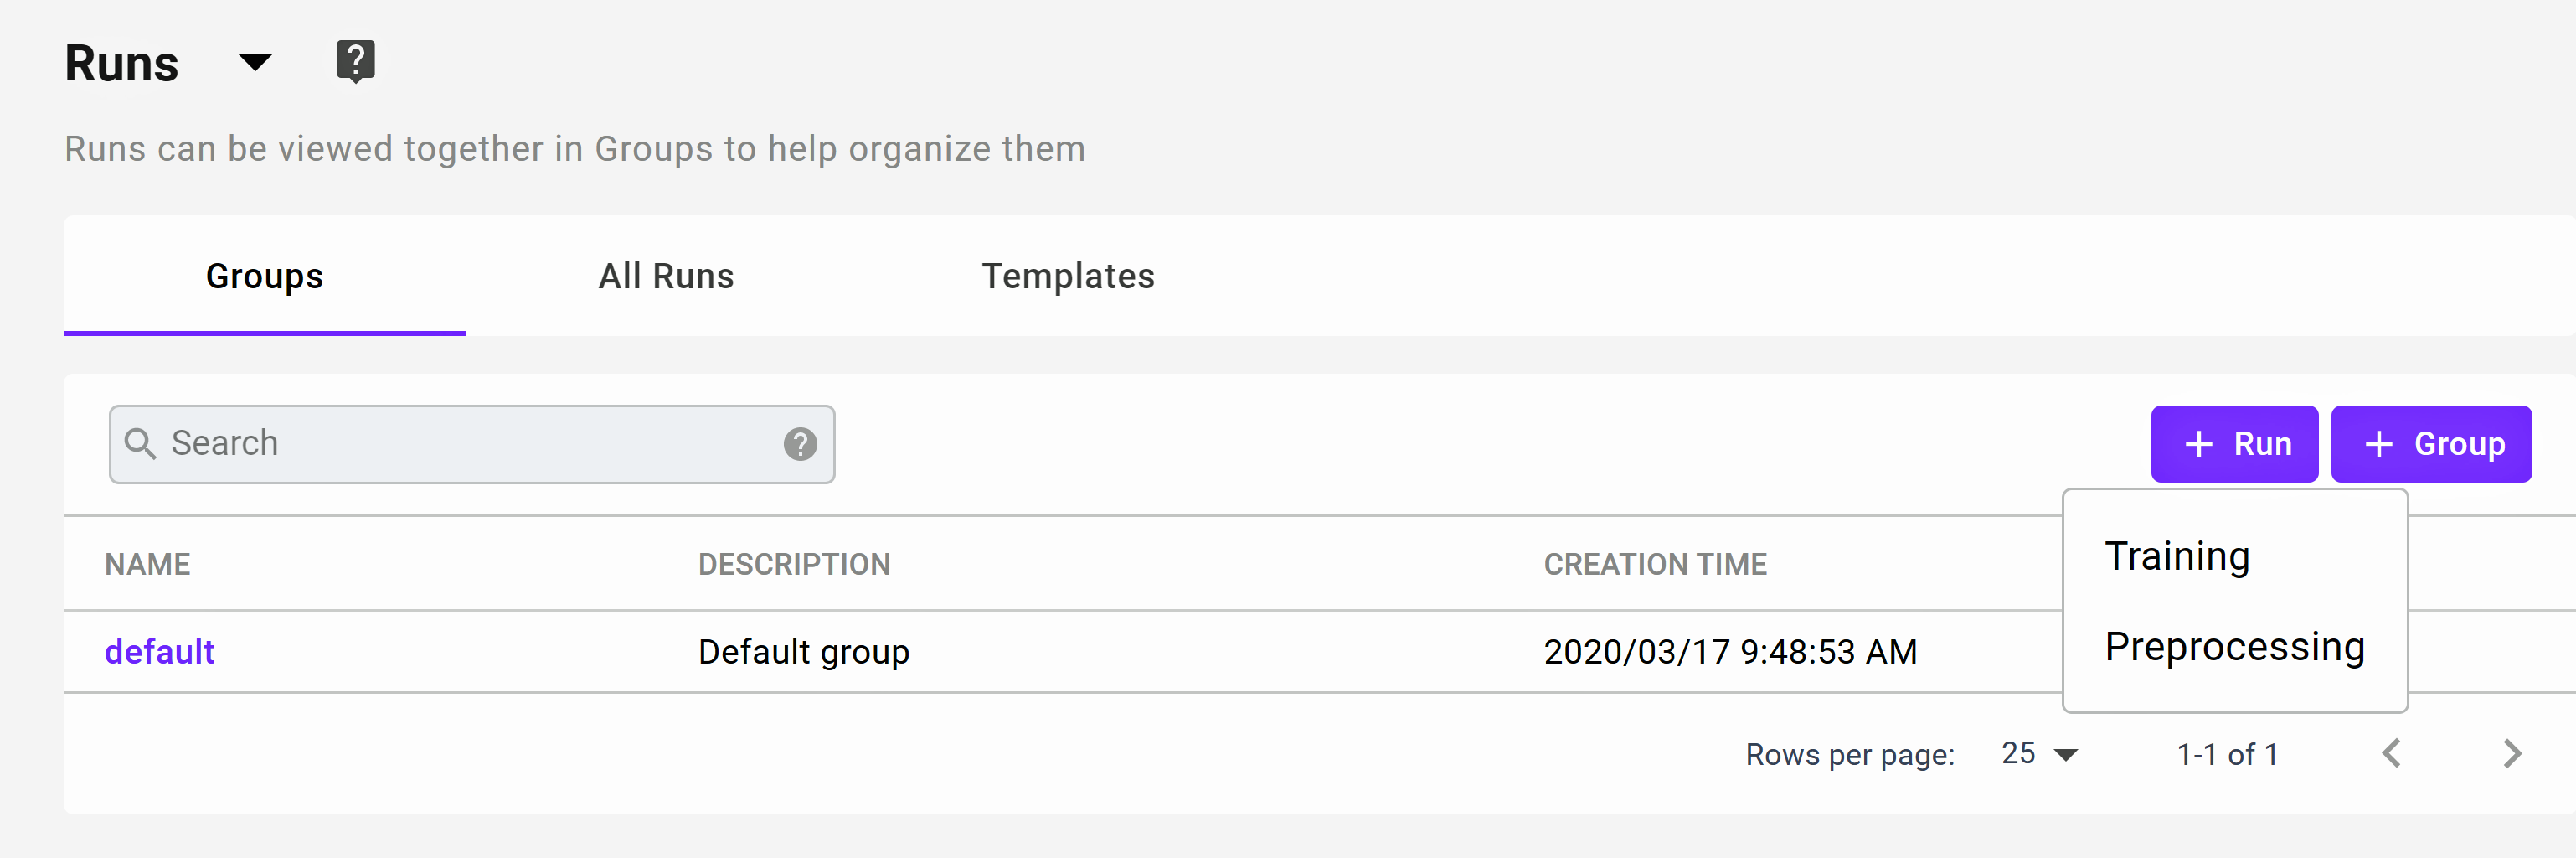
Groups
Runs can be put into categories called Groups to allow them to be more easily viewed and managed. The definition of a Group is entirely up to the user. When a Run is submitted, it is placed in a selected Group, and can be viewed from the main Run menu under the Groups tab. There is a default Group available, and any Run not put into another Group is put in the Default Group.
Templates
Run Templates are a way to simplify the submission of Runs. They allow many of the fields to be pre-filled, similar to cloning a run from another run. For example, the user may want to do a number of runs with different hyperparameters or resources. A Template can be used to fill in the fields, then the updated hyperparameters or resources can be selected before submitting the new Run.

Training Runs
Training runs create Models as their output.
TensorBoard
TensorBoard can be accessed from the Runs screen.
When a Run instance is created, TensorBoard is in the “stopped” state. In order to use it, TensorBoard must be started by selecting the play icon.
Note
It can take several minutes for TensorBoard to be active after being started
Note
It is good practice to stop TensorBoard instances if they are not going to be used in order to conserve system resources
Training Run Actions
There are actions that can be performed on a Training Run instance. For these actions, the Run instance checkbox is selected, and the action is performed by choosing the appropriate icon.
A Run instance can be stopped or started
Run instances can be deleted
A new Run instance can be created by either cloning it (clone icon), or starting from a blank configuration (+ Run icon)
Hyperparameter Optimization
DKube supports Katib-based hyperparameter optimization. This enables automated tuning of hyperparameters for a program and dataset, based upon target objectives. An optimization study is initiated by uploading a configuration file during the Training Run submission as described in Configuration Submission Screen - Hyperparameter Tuning .
The study initiates a set of trials, which run through the parameters in order to achieve the objectives, as provided in the configuration file. After all of the trial Runs have completed, DKube provides a graph of the trial results, and lists the best hyperparameter combinations for the required objectives.
The optimization study is ready for viewing when the status is shown as “complete”. That indicates that the trials associated with the study are all complete. The output results of the study can be viewed and downloaded by selecting the Katib icon at the far right hand side of the Run line.
As described in section Configuration Submission Screen - Hyperparameter Tuning, an optimization Run is initiated by providing a YAML configuration file in the Hyperparameter Optimization field when submitting a Run.
A study that has been initiated using Hyperparameter Optimization is identified by the Katib icon on the far right.

Selecting the icon opens up a window that shows a graph of the trials, and lists the best trials based on the objectives.

Training Run Details
More information can be obtained on the Run by selecting the name. This will open a detailed window.

Lineage
DKube provides the complete set of inputs that are used to create a Model from a Training Run. The overall concept is described in section Tracking and Lineage. The lineage is accessed from the details screen for a Run.

Create Training Run
A Training Run can be created in the following ways:
Create a Run from a JupyterLab or RStudio instance, using the “Create Run” icon on the right-hand side of the selected instance
This will pre-load the parameters from the instance
Create a new Training Run by selecting the “+ Run” button at the top right-hand side of the screen, and fill in the fields manually
The type of run, training or preprocessing, is chosen
A Run can be created from a Template ( Templates ) that will pre-fill in many of the fields
Clone a Training Run from an existing instance
This will open the same new Training Run dialog screen, but most of the fields are pre-loaded from the existing Run. This is convenient when a new Run will have only a few different fields, such as hyperparameters, as the existing Run.
A Run is automatically created as part of a Pipeline
For the cases where a Run is created by the User, the “New Training Run” screen will appear. Once the fields have been filled in, select “Submit”.
Note
The first Run will take additional time to start due to the image being pulled prior to initiating the task. The message might be “Starting” or “Waiting for GPUs”. Each time a new version of the framework is run for the first time, the delay will occur. It will not happen after the first run.
Mount Path for Datasets and Models
The Dataset & Model repos that are added as part of the submission contain a field called the “Mount Path”. This is a path that is used by the Project code to access the repo. This is describe in more detail at Mount Path for Datasets and Models .
New Training Run Fields
The Run fields are similar to the Create IDE fields (See section Basic Submission Screen). The following fields are different than the IDE fields:
Basic Submission Screen
The Basic screen has several fields for selecting an existing Template and a Group, if desired.

There is an addition field at the bottom of the screen called Start-up command. This is the program that needs to be run first in order to do the training.
Repo Submission Screen
The Repos screen has an output Model section for the trained model in addition to the input Model section (for transfer learning).

The format for the output Model is similar to the input Model. Even though the field is for an output trained model, there still needs to be an entry in the Models repo so that the model can be properly tracked and versioned. The new trained model will become the next version of the model that is added to the submission.
In order to create a completely new model - with Ver 1 - a new DVS model should be created as explained in the section Models.
Configuration Submission Screen - Hyperparameter Tuning
The Configuration screen has additional fields that allow more actions for the Run beyond what is possible with an IDE.

In addition to the ability to add or upload hyperparameters, the Training Run can also initiate a Hyperparameter Optimization run.
In order to specify that the Run should be managed as a Hyperparameter Optimization study, a yaml file must be uploaded that includes the configuration for the experiment.
The YAML files for the examples that are included with DKube are available at the following links.
Example |
Hyperparameter File |
|---|---|
mnist |
https://oneconvergence.com/guide/downloads/mnist-tuning.yaml |
catsdogs |
https://oneconvergence.com/guide2/downloads/catdog-tuning-2.yaml |
The YAML file should be downloaded locally, and used when submitting the Run. The YAML file can be edited to have different configurations.
Leaving this field blank (no file uploaded) will indicate to DKube that this is a standard (non-hyperparameter optimization) Run.
The format of the configuration file is explained at Katib Introduction.
Configuration Submission Screen - GPU Distribution
Runs can be submitted with GPUs distributed across the cluster. The Project code needs to be written to take advantage of this option. In order to enable this, the “Distributed workloads” option needs to be selected.

The distribution can be accomplished automatically or manually.
If the automatic distribution option is selected, DKube will determine the most effective way to use the GPUs across the cluster.
If the manual distribution option is selected, the user needs to tell DKube how the GPUs should be distributed. For this option, the user needs to understand the topology of the cluster, and know where the GPUs are located.
When distributing the workload manually across nodes in the cluster, the number of workers needs to be specified. DKube takes the number of GPUs specified in the GPU field, and requests that number of GPUs for each worker.
So, for example, if the number of GPUs is 4, and the number of workers is 1, then 8 GPUs will be requested, spread across 2 nodes.
Stop Run
Select the Run to be stopped with the left-hand checkbox
Click the “Stop” icon at the top right-hand side of the screen
Preprocessing Runs
A Preprocessing Run outputs a Dataset entry when it is complete. This is typically done in order to modify a raw dataset such that it can be used for Training.

Create Preprocessing Run
A Preprocessing Run can be created in the following ways:

Create a new Preprocessing Run by selecting the “+ Run” button at the top right-hand side of the screen, and selecting “Preprocessing”.
A Run is automatically created as part of a Pipeline
For the cases where a Preprocessing Run is created by the User, the “New Preprocessing Run” screen will appear. Once the fields have been filled in, select “Submit”
Note
The first Run will take additional time to start due to the image being pulled prior to initiating the task. Each time a new version of a framework is run for the first time, the delay will occur. It will not happen after the first run.
New Preprocessing Run Fields
The fields are similar to the creation of a Training Run (See section Create Training Run). The Preprocessing fields are different in the following ways:
The Basic screen includes a docker image
The Repos screen has a Dataset output rather than a Model output
The Configuration screen has different options
Basic Submission Screen
In addition to the standard fields, including the name of the run, tags, and start-up command, the Preprocessing Basic screen includes a docker image field that points to the image created by the user.

Repo Submission Screen
The Repos screen is filled in similarly to the Training Run, but instead of a Model output, there is a Data output.

Test Inferences
DKube allows the user to test the quality of the trained model without deploying it for production serving. This is managed from the “Test Inferences” screen. A Model can be deployed for testing, which will run the model on a local endpoint and expose the inference for testing with an external application.

The status messages are described in section Status Field of IDEs & Runs .
Testing the Inference
One Convergence has created a UI-based application to test the inferences for the examples included as part of the DKube installation (see section Example Project and Dataset Locations). It is accessed from a special notebook that gets initiated automatically after DKube is installed, called “DKube”.
Note
The DKube Notebook may not be running. If it is in the “stopped” state, select the DKube Notebook instance and start it.
Note
The inference application supplied here will not work for any programs that are outside of the examples included as part of DKube

Opening a JupyterLab notebook from this DKube entity exposes a file in the /tools/ folder called “dkube.html”.
Before choosing any application, select the Trust HTML button at the top of the JupyterLab window. The mode toggles, so selecting it will instruct JupyterLab to allow the application to be opened.
After this step, select the “DKube Inference** application by right-clicking and opening a new tab.

This will open a tab that contains the test inference application. Fill in the fields as follows:
Model Serving url |
Endpoint API from the Inferences screen where the inference is running |
Authorization Token |
OAuth token from the Developer Settings menu at the top right of the screen |
Model Type |
Type of model to test |
Upload Image |
Image based on the type of model |
The details on each of the examples are provided in section Example Project and Dataset Locations.


Kubeflow Pipelines
DKube supports Kubeflow Pipelines. Pipelines describe a workflow structure graphically, identifying the flow from one step to the next, and define the inputs and outputs between the steps.
An introduction to Kubeflow Pipelines can be found at Kubeflow Pipelines.
The steps of the pipeline use the underlying components of DKube in order to perform the required actions.
The following sections describe what is necessary to create and execute a Pipeline within DKube.
Create Project & Dataset
Prior to creating the pipeline, a Project and Dataset must be created that exactly matches the names expected in the example pipelines provided. An explanation of how to add a Project is in Section Add a Project, and how to add a Dataset is in Section Add a Dataset.
The locations of the projects and datasets for the examples are listed at Example Project and Dataset Locations.
Create Pipeline
The Pipeline definition is managed from a JupyterLab Notebook. There is a special Notebook created within DKube after installation, with the name “DKube”. This Notebook is used to create the pipeline and start an experiment.
Note
The DKube Notebook may not be running. If it is in the “stopped” state, select the DKube Notebook instance and start it.
Selecting the Jupyter icon will open a window that includes a number of folders. Select the folder “/pipeline/ipynb/”.
Within that folder, there are a number of IPYNB files, each one describing one of the DKube examples provided.
Pipeline |
Description |
|---|---|
dkube-mnist-pipeline.ipynb |
Classify images of digits |
dkube-resnet-pipeline.ipynb |
Identify cats and dogs |
Selecting this example will open a window within JupyterLab that can be used to compile the description, create a pipeline, and start an experiment.

Run all of the cells within Jupyter. This will create the pipeline and run an experiment.

Managing Pipelines

The pipelines that have been uploaded or created within DKube are available from the “Pipelines” menu. There are a number of pipelines that come with a standard DKube installation. New pipelines can be uploaded to DKube by selecting the “+ Upload Pipeline” button and entering the access information.
A new Run can be created from a Pipeline by selecting the Pipeline name and choosing either a Run or an Experiment. The Experiment choice will put the Run into that Experiment.

Managing Experiments and Runs
Experiments that have been created from pipelines are managed from the Experiments screen.

Within each experiment, the Runs that are part of that Pipeline are visible by selecting the Experiment name.

This provides the status of the Run.
Selecting the name of the Run brings up the current state of the Pipeline. Selecting a Pipeline box within the “current state” screen brings up a window that provides more details on the configuration and status of the Run.

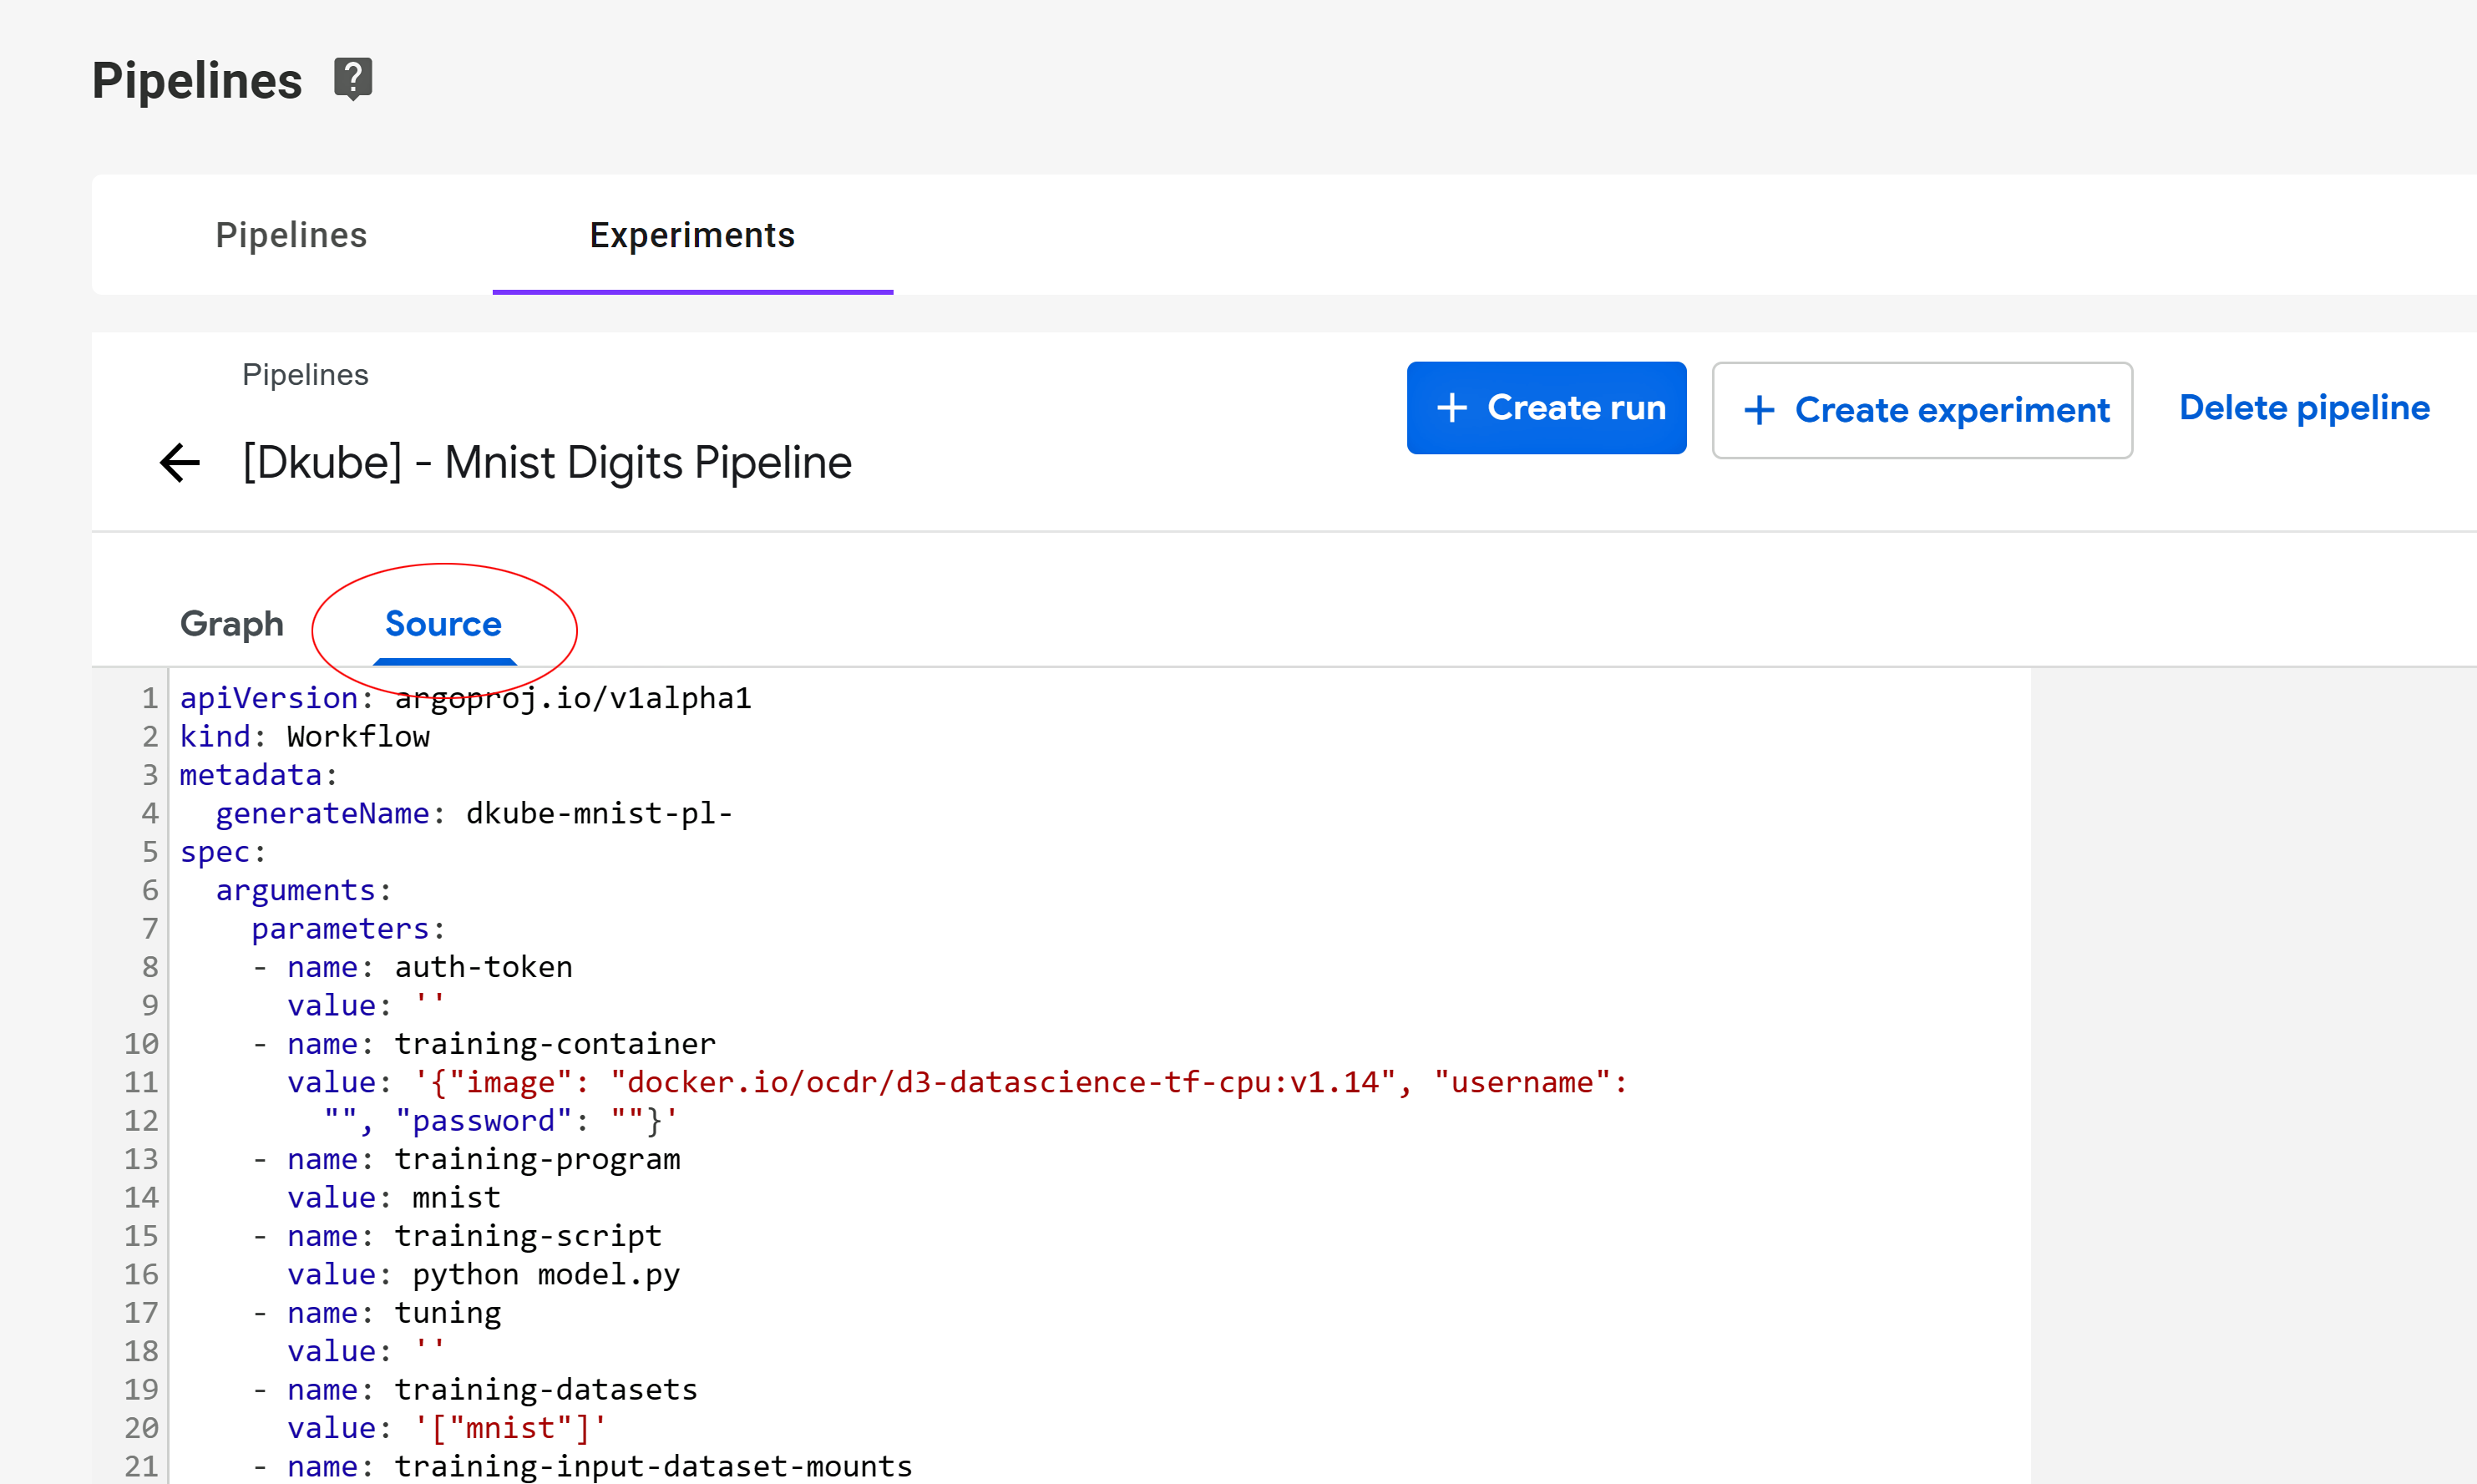
Selecting “Pipeline” brings up a screen that shows the entire Pipeline. Selecting the Step box in that window brings up the details of the Run parameters.

Within the full Pipeline view, the source code can also be inspected by selecting the “Source” tab.